Introduction
It’s recommened to read this guide in full before you start executing commands, so you have an idea of what you can expect. It’s not a fool proof copy-paste tutorial.
Around 14 September the Ethereum Merge took place. Ultrasound is also a nice tool to track the merge.
https://ethereum.org/en/upgrades/merge/

In short Ethereum 2.0 is going to launch under the same ticker (ETH), with a PoS (Proof of Stake) protocol instead of PoW (Proof of Work).
This eliminates the mining, and only supports staking as alternative to get interest as a ‘validator’ (this requires 32 eth, and is out of scope for this guide)
“The Merge represents the joining of the existing execution layer of Ethereum (the Mainnet we use today) with its new proof-of-stake consensus layer, the Beacon Chain”
If you are running an Ethereum node, probably using geth, you need to install an additional Beacon client to support this new consensus layer, even if you are not a validator. Validators also need to install an additional validator client.
Beacon setup (Lighthouse)
You can copy all commands you need by clicking the copy icon in the top right corner of every codeblock.
Instructions to prepare your node are stated below.
Alternatively you can also use this guide/checklist, but most guides do not specify the difference for stakers and validators clearly.
Modify GETH
Extend your geth startup params (in a service probably) with:
--authrpc.addr localhost --authrpc.port 8551 --authrpc.vhosts localhost --authrpc.jwtsecret /var/lib/goethereum/geth/jwtsecret
For example in geth.service, extend the ExecStart line:
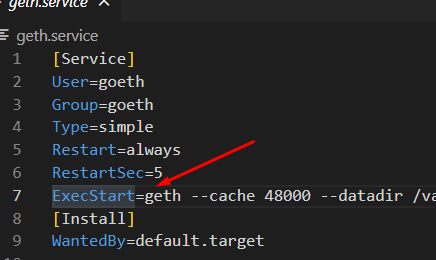
with:

Asuming port 8551 is free, and –authrpc.jwtsecret should point to your data dir configured with the file jwtsecret.
Save the file and restart the service:
systemctl daemon-reload
systemctl geth restart
systemctl geth status
sudo journalctl -f -u geth.service
Install a beacon (consensus) client to connect with the modified geth
Assuming you are not a validator, follow the steps 4.1, 4.2 and 4.4 on this tutorial and then come back here.
For your ease:
curl --proto '=https' --tlsv1.2 -sSf https://sh.rustup.rs | sh
echo export PATH="$HOME/.cargo/bin:$PATH" >> ~/.bashrc
source ~/.bashrc
sudo apt-get update
sudo apt install -y git gcc g++ make cmake pkg-config libssl-dev libclang-dev clang acl
cd; git clone https://github.com/sigp/lighthouse.git
cd lighthouse
git fetch --all && git checkout stable && git pull
make
ufw allow 9000
ufw reload
- If you have followed steps 1, 2 & 4 in the guide, and want to use the service file below make sure to move the binary file:
sudo cp /$HOME/.cargo/bin/lighthouse /usr/local/bin
- Binary Lighthouse install (not needed if you followed the above):
After installing Rust (step 4.1 from coincashew), install the lighthouse binary by downloading it from or build from source and add it to /usr/local/bin.
Check the version:
lighthouse --version
You should see something like this (expected output at time of writing):
Lighthouse v3.1.0-aa022f4
BLS library: blst
SHA256 hardware acceleration: true
Specs: mainnet (true), minimal (false), gnosis (false)
Firewall additions
You probably already did this in step 4, but for ease of use you can run the commands below if you use UFW.
sudo ufw allow 9000/tcp
sudo ufw allow 9000/udp
sudo ufw reload
Service file for Lighthouse beacon node
Start with creating a service user and directory for the data the beacon client downloads:
sudo useradd --no-create-home --shell /bin/false lighthousebeacon
sudo mkdir -p /var/lib/lighthouse/beacon-node
sudo chown -R lighthousebeacon:lighthousebeacon /var/lib/lighthouse/beacon-node
Create new service
sudo nano /etc/systemd/system/lighthousebeacon.service
For a faster sync you can add a infura endpoint, refer to the docs here.
[Unit]
Description=Lighthouse Beacon Node
After=network.target
Wants=network.target[Service]

[Service]
User=lighthousebeacon
Group=lighthousebeacon
Type=simple
Restart=always
RestartSec=5
ExecStart=/usr/local/bin/lighthouse beacon_node --datadir /var/lib/lighthouse/beacon-node --http --eth1-endpoints http://127.0.0.1:8545 --execution-endpoint http://localhost:8551 --execution-jwt /var/lib/goethereum/geth/jwtsecret --metrics

[Install]
WantedBy=default.target
Important for the migration are:
- –execution-endpoint = new
- –eth1-endpoints = endpoint of your current (‘eth1’ node), and optional a list with other nodes next to localhost.
Edit service file permissions
sudo chmod 644 /etc/systemd/system/lighthousebeacon.service
Also important is that the service user has access to: ‘/var/lib/goethereum/geth/jwtsecret’ in this case. Else the service will fail with a permission denied error. The directory can be different, it should be in your geth datadir. To fix the permissions run:
setfacl -R -m u:lighthousebeacon:rwx /var/lib/goethereum/geth/
Other common permission cases:
sudo chown -R lighthousebeacon:lighthousebeacon /home/eth/node/lighthouse/beacon-node/beacon
Start the beacon service
sudo systemctl enable lighthousebeacon
sudo systemctl daemon-reload
sudo systemctl start lighthousebeacon
sudo systemctl status lighthousebeacon
sudo journalctl -u lighthousebeacon.service -f
Output should contain: INFO Ready for the merge
![]()
Now it’s is also syncing to get download data, similar to geth. U can run the command below to check data usage.
du /var/lib/lighthouse/beacon-node -h --max-depth=0
Example output: 1.9G /var/lib/lighthouse/beacon-node
References
- GitHub - sigp/lighthouse: Ethereum consensus client in Rust
- https://lighthouse-book.sigmaprime.io/merge-migration.html#execution-engine-configuration
- https://medium.com/coinmonks/how-to-setup-ethereum-2-0-validator-node-lighthouse-meddala-goerli-4f0b85d5c8f
- https://launchpad.ethereum.org/en/merge-readiness/
- https://lighthouse-book.sigmaprime.io/checkpoint-sync.html